Neues Board, neuer Bereich wir bauen um

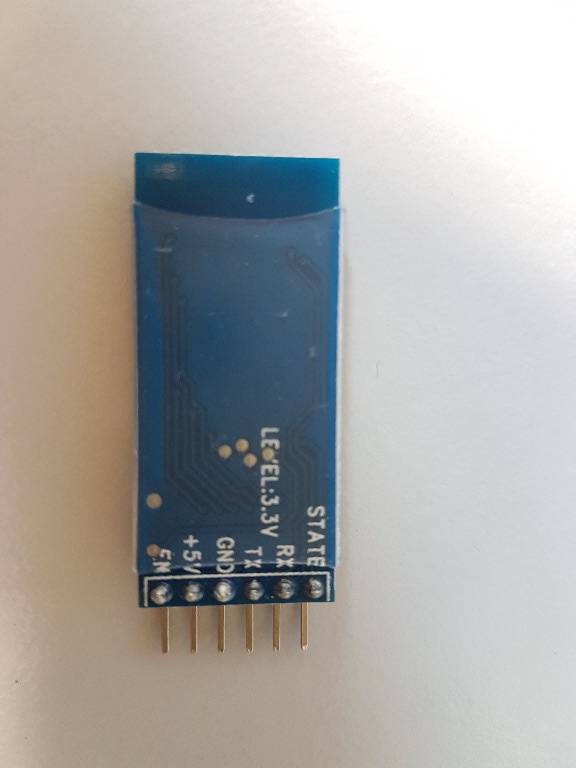
Here an old picture because the module is hot glue on the PVB1.3
backbt05_2017-07-26.jpg


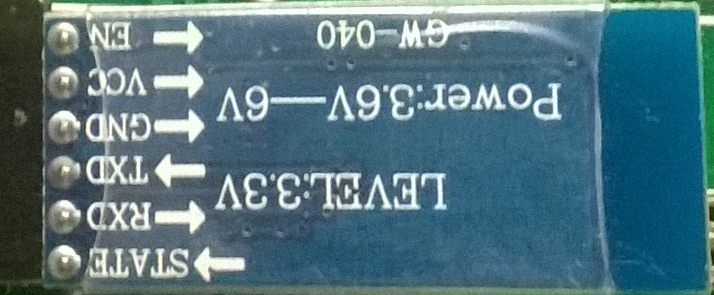
And there is a Key input it's EN note on the Module.

Maybee need to use a breadboard for the first setting in AT COMMAND if i remenber the led need to flash at different speed in this mode.

By
Attachment: https://forum.ardumower.de/data/media/kunena/attachments/3545/backbt05_2017-07-26.jpg/
 
Zuletzt bearbeitet von einem Moderator:
Scheinbar ist mein Modul defekt. Nachdem ich dieses auf 921600 Baud eingestellt habe, kam ich nicht mehr in den AT Modus rein. Den Namen konnte ich vorher ändern. Ich hatte noch ein Ersatzmodul von 07.2016 aus dem Macrotroincs shop. Und dieses zeigte mir sofort nach key auf 3.3v legen einen 2 sek LEDTakt an. Außerdem hat dieses eine blaue LED gehabt, wobei das neue diese scheinbar nicht mehr hat? Seht Ihr eine blaue LED auf dem dem neuen Modul?

@Bernard
Yes, thats right. But you can only set a command, when you are in the AT mode. And I understood, that you came in this mode while pressing the button?
Holy shit, It works for me also with the old module from 2016 without connecting enable. Pressing the button and connect the 5V pin and I am in AT mode. The new modul won't do this on this way.
 
Hi Roland.
I don't understand .
You can put the module in AT mode or not ?.

Yes, thats right. But you can only set a command, when you are in the AT mode.
Look at bt.cpp
You need to put the module in AT command only one time and launch the setting procedure with console in azurit so the parameter in bt.cpp can be set and after a reboot in normal mode the module work correctly.

What's exactly your new module ??
 
The new modul which came with the pcb1.3 I was not able to set in AT mode with the button. Only with the key pin. But here the LED was not blinking in 2sec interval.

Then I used my old module. And here I was able to set in AT mode with the button. I think the new module has a defect in order the LED was not blinking when I set it in AT mode with the key pin and after changing the speed I was not able to set it in AT mode again.
And now the old modul starts also, when I connnect the DUE to USB. The new modul somtimes didn't start.


Anyway now this works for my to bring the Bluetooth module in AT mode:

1.) Install it on the board without power
2.) Press the button on the modul and then connect the battery power
3.) Holding the button for nearly 2 seconds. (don't release the button)

Now the mudul is blinking in 2sec interval.
 
1.) Install it on the board without power
2.) Press the button on the modul and then connect the battery power
3.) Holding the button for nearly 2 seconds. (don't release the button)

Now the mudul is blinking in 2sec interval.
Wir haben aktuell eine Charge BT-Module
20170727_110816.jpg

die nicht anfangen zu blinken (Programmiermodus)
Bei diesen Modulen muss der Knopf gedrückt werden bis das Modul fertig beschrieben ist.
Also Anschließen, Knopf drücken und halten,Spannung drauf geben , Modul beschreiben und wenn alles fertig ist Knopf loslassen.

Änderungen im Zubehör.
Es liegen ab sofort 4 x 40pol. Stiftleisten bei (vorher 2) , sollte auch für die Stromversorgungsleisten reichen.
Die Schraubanschlüsse für Akku etc. liegen komplett bei, 4 x 2 und 2 x 6
Die XH Buchsen für alle wichtigen Anschlüsse liegen bei, 1x2, 9x3, 4x4, 5x5 und 2x6.
Wie wir es mit den Kabeln für die XH Buchsen machen wird noch geklärt
Attachment: https://forum.ardumower.de/data/media/kunena/attachments/191/20170727_110816.jpg/
 
Zuletzt bearbeitet von einem Moderator:
Die Lösung alles mitzuliefern ist besser. Sonst muss man wegen Pfennig Artikeln eine neue Bestellung auslösen. Man kennt ja am Anfang das Board nicht und weiß nicht was man benötigt. Eine andere Möglichkeit wäre eine extra Bestellposition einzufügen, die Vollbestückung oder so ähnlich heißt.
Wobei ich allerdings lieber selber Crimpe. Da sehen die Kabel dann besser aus. Aber das ist Geschmackssache.
 
I wrote 2 BT test programs for the HC05 Module
.
First: BluetoothATTest
Here you can test if the BT Module is in AT Mode. It sends "ATrn" over the line and receives OK when it works. If it works, the connection to the BT module is also OK.

Second: BluetoothSendData
This will send data ober the BT Modul which should not be in AT mode. If you use a terminal program on your phone, like a Arduino Central, you can see this data and can send data back. Therefore you know that the Hardware works.

Until now, I used BT with a speed of 921600. Looks like the DUE can only handle 115200 on a serial line. Has someone experiance with higher speed?
Attachment: https://forum.ardumower.de/data/media/kunena/attachments/2936/PCB13Test.zip/
 
Zuletzt bearbeitet von einem Moderator:
Hallo

Leider bekomme ich immer noch keine Verbindung zum BT-Modul hin.
Mir ist aufgefallen das die Spannungswandler für 5 und 3.3 Volt sehr warm werden ( 52°C) ist das normal ?

Welche Temperatur habt Ihr ?

Grüße
André
 
Ja, der Spannungswandler wird bei mir auch warm. Habe ich bereits auch angemerkt. Das bei nur 200mA die das Board vermutlich nur für die Dioden benötigt. Oder werden diese in Hitze umgewandelt?
 
Hi Andre and Roland.

3 or 4 weeks ago i have the same problem when i did some test on the board without motor driver and without IMU (only BT and bad RTC) sometimes the DC converter heat near 40Deg.

But now the board is into the mower with BT,New RTC,IMU,Motor Driver and the 2 DC converters are totaly cold.

Maybe a too low current or a RTC problem can do this ????

By.
 
Hallo zusammen,

ich bekomme ebenfalls das BT Modul nicht zum laufen. Bei dem Modul handelt es sich um ein HC-05, welches zwei Jahre im alten Mower tadellos lief.
Ich habe es wie auf den Fotos zu sehen angeschlossen. Jumper für Versorgungsspannung (5v) und Signal (3.3V) sind gesetzt.
Nach drücken des Buttons und anschließen vom Akku konnte ich das Modul über die Konsole beschreiben. Es wurde erkannt und die Baudrate wurde gesetzt. Während des gesamten Vorgangs habe ich den Button gedrückt gehalten.

Ich kann mich nun mit dem Modul verbinden, aber es werden keine Daten übertragen. ArduRemote macht einfach nichts, pfod App bringt einen Timeout. Die Bargraph Anzeige zeigt auch an, dass das Modul verbunden ist. Jemand eine Idee, wie ich das löse?

Hi,

I also have trouble with my bluetooth module. It's a HC-05 module which works the last two years without trouble on PCB 1.2 I connected it like shown on pictures. Also I set jumpers for voltage (5V) and signal (3.3v). To program the module, I pressed the button, connected the battery and used serial console. It told me that it was sucessfully set. During the procedure, I didn't release the button. After restarting everything (disconnect and re-connect battery) I'm able to pair with my device. But neither Arduremote nor pfod is able to communicate. ArduRemote does nothing, pfod brings a timeout after few seconds. On bargraph, bluetooth led is on. Any ideas what is missing here?
Attachment: https://forum.ardumower.de/data/media/kunena/attachments/2946/20180207_055737.jpg/
 
Zuletzt bearbeitet von einem Moderator:
Hi.
What version and where did you download the Azurit.
Take a look at the starting console to be sure the code run correctly and can manage Pfod command,Normaly if the module work on the Pcb 1.2 you have nothing to do to make it work on Pcb 1.3.
By.
 
Hi,

it's strange. I tried it yesterday two hours without success. Today, the first attempt was successful. I didn't change anything. It's cusious but it works like a charm.

Currently I used my fork of Azurit 1.0a8

Hallo,

schon komisch, heute klappt es auf Anhieb. Gestern habe ich zwei Stunden rumprobiert und es nicht geschafft. Heute schalte ich es ein und kann mich direkt verbinden.

Aktuell nutze ich meine Version von Azurit 1.0a8
 
Heute schalte ich das Board ein um weitere DInge zu testen, wieder kein Bluetooth. Meine Geräte verbinden sich, es werden aber keine Daten übertragen Hat jemand eine Erklärung dafür?
 
Hi
Maybe a I2C error on RTC memory.
Please go into console and try to read setting to be sure BT is enable

Code:
---------- timer ---------------------------------------------
timerUse                                   : 1
---------- bluetooth-----------------------------------------
bluetoothuse                               : 1
---------- esp8266 ------------------------------------------
esp8266Use                                 : 0
esp8266ConfigString                        : 123test321


Remember that the DUE use the Eprom on RTC to save config and if the RTC is not working correctly the config value can't be loaded or saved
Check also in mower.cpp. if the BT is enabled.
Try with Console to save the setting and it's need to take at least 5 secondes, if it's immediate it's not normal.

A lot of member have RTC issue (One Day OK and the day after BAD) so first you need to be sure you can load and save setting .

By.
 
Hi,

I noticed that RTC/timer was disabled but bluetooth enabled. So I enabled RTC in code (as I'm not sure if it would be correct saved in RTC EEPROM, if RTC is disabled), upload und tried again. It didn't work at all. So I printed the config and noticed, that it can't be right because RTC was marked as off. I uploaded again and enter console. First of all, I saved user settings without changing anything. After that, configuration gets printed correctly. In my opinion, EEPROM was filled with random data resulting in this behavior.

After that, I reset bluetooth module and I'm now able to connect. Also after disconnectint battery and USB and reconnect battery, I can use bluetooth.

Saving settings takes approx. 3 Seconds while buzzer beeps.

I will closely watch if this problem occurs again.
 
Hi Paddy.
Here i explain how setting work, and if you never use save setting the mower use value from mower.cpp. https://www.ardumower.de/index.php/...ull-odometry-mouvement-control?start=40#14158 RTC contain 2 ships one for timer and one for Eeprom , very ofen the timer is damage but the eeprom work.
Simply change something with PFOD (ex: MaxSpeed) and save setting; disconnect the battery and USB and restart to verify if the new value is OK.
By.
 
Oben