Du verwendest einen veralteten Browser. Es ist möglich, dass diese oder andere Websites nicht korrekt angezeigt werden.
Du solltest ein Upgrade durchführen oder einen alternativen Browser verwenden.
Du solltest ein Upgrade durchführen oder einen alternativen Browser verwenden.
ArduMower Brushless Drive
- Ersteller BerndS
- Erstellt am
Hi @Stale!hast du den JYQD_V7 schon getestet, funktioniert der? Falls ja was muss alles abgeändert werden damit man damit es funktioniert?
Ich warte aufs Ende der Mittasruhe um die Mähscheibe auszuwuchten. Davor habe ich aber bereits etwa 50qm als Probe mähen können.
Die Spannungsversorgung und den Motor samt Hall Sensoren habe ich analog zum ArduMower Driver an den JYQD_V7 angeschlossen. Die mit SET markierte Buchse habe ich so angeschlossen:
- direkte Brücke zwischen 5V und EL (rot)
- Signal als Odometrie (weiß)
- Z/F als Direction (blau)
- VR als PWM (gelb)
- GND als Masse (schwarz)
Daher habe ich im Sunray Source Code diese beiden Zeile entfernt. Die 2-PWM Schwelle gilt jetzt also auch nicht mehr für meine Antriebsmotoren, die drehen sich allerdings nicht. Ich möchte das aber ganz gerne noch in der config.h einstellbar machen, doch als nächstes ist Auswuchten und dann Ausprobieren und Staunen dran.


Hartmut
Active member
Ich staune, das du den JYQD_V7 5V Logik direkt ohne Pegelwandler angeschlossen hast. Der Due hat doch 3.3 V Logik. Daher habe ich den Bruchlessadapter noch dazwischen. Zum Anlaufvèhalten gab es schon mal im Forum eine Codeänderung.
Oder ist das noch ein anderer Treiber als der Brushless Treiber Controller BLDC Motor Driver 12-36V 15A 500W mit Hall speed control aus dem Shop?
Oder ist das noch ein anderer Treiber als der Brushless Treiber Controller BLDC Motor Driver 12-36V 15A 500W mit Hall speed control aus dem Shop?
Anhänge
Hallo!
Ich greife mal diese Frage auf und bitte um Erläuterung:
? Wie findet eigentlich die Strommessung am Brushless-Adapter statt?
? Gibt es einen Schaltplan zum Brushless Adapter?
Danke+Beste Grüße, Rolf
Hallo und guten Tag,
an einem Schaltplan mit Messpunkten hätte ich auch Interesse.
Ich habe folgendes Problem.
Schalte ich meinen Roboter ein, drehen sich kurz die Antriebsmotoren vor- und rückwärts.
Die passiert auch wenn ich die Sunray-App aufrufe, da drehen sich kurz beide Motoren in einer Richtung.
Das war es aber schon, danach kann ich weder mit AT+E oder mit der App die Motoren bewegen.
Im Monitor läuft permanent für alle 3 Motoren „Motorfehler“.
Es sieht so aus als würden die Motoren gar nicht erkannt.
Kondensatoren, Widerstände (1K) und die 5 Volt sind verbaut, bzw. vorhanden.
Hat jemand eine Idee?
Grüße
Manfred
Also die Stecker sind richtig aufgelötet. Die Stromzuleitung Rot/Schwarz haben welchen Querschnitt? 0,5 - 0,7mm² mehr sollten die nicht haben. Hast du in der config.h, auf Brushless umgestellt? Sollte so aussehen, siehe weiter unten grün markiert, alles andere mit zwei Strichen aus kommentieren.
// choose ticks per wheel revolution :
// ...for the 36mm diameter motor (blue cap) https://www.marotronics.de/2-x-36er-DC-Planeten-Getriebemotor-24-Volt-mit-HallIC-30-33-RPM-8mm-Welle
//#define TICKS_PER_REVOLUTION 1310 / 2 // odometry ticks per wheel revolution
// ...for the 36mm diameter motor (black cap) https://www.marotronics.de/MA36-DC-...-30-33-RPM-8mm-Welle-ab-2-Stueck-Staffelpreis
// #define TICKS_PER_REVOLUTION 975 / 2
// ...for the newer 42mm diameter motor (green connector) https://www.marotronics.de/MA42-DC-...-30-33-RPM-8mm-Welle-ab-2-Stueck-Staffelpreis
// #define TICKS_PER_REVOLUTION 696 / 2 // odometry ticks per wheel revolution
// ...for the older 42mm diameter motor (white connector) https://wiki.ardumower.de/images/d/d6/Ardumower_chassis_inside_ready.jpg
//#define TICKS_PER_REVOLUTION 1050 / 2 // odometry ticks per wheel revolution
// ...for the brushless motor april 2021 https://wiki.ardumower.de/index.php?title=Datei:BLUnit.JPG
#define TICKS_PER_REVOLUTION 1300 / 2 // 1194/2 odometry ticks per wheel revolution
// #define TICKS_PER_REVOLUTION 304 // odometry ticks per wheel revolution (RM18)
Stephane_bzh
Member
Hi all
For information all is still working on my side!
I upgraded to firmware 1.0.195, i will test soon with this firmware, but i don't think someting bad will happen.
Stephane.
For information all is still working on my side!
I upgraded to firmware 1.0.195, i will test soon with this firmware, but i don't think someting bad will happen.
Stephane.
paddy
Active member
Hello,
if someone needs a new motor driver PCB, I'm currently selling one driver V1.0. This is the DIY Version and it has never been flashed. If someone needs a replacement, it might be helpful as shop is currently out of stock. I sell it as my new mower will work completely different.
if someone needs a new motor driver PCB, I'm currently selling one driver V1.0. This is the DIY Version and it has never been flashed. If someone needs a replacement, it might be helpful as shop is currently out of stock. I sell it as my new mower will work completely different.
Biete BLDC Treiber V 1.0 in der DIY Version
Ich biete hier einen DIY BLDC Treiber V1.0, natürlich ungeflashed. Dazu lege ich noch einen defekten (rechts im Bild). Hier hatte ich versehentlich Pins vom Treiber IC berührt und kurzgeschlossen. Der Treiber wird heiß, wenn Spannung anliegt,macht aber sonst nichts mehr. Vielleicht kann jemand...
forum.ardumower.de
Habe aktuell noch einen Fehler vom Mähmotor, komisch ist es das man den Mähmotor per APP anschalten und auch wieder ausschalten kann. Also sprich der Mähmotor läuft. Nur im seriellen Monitor sehe ich aktuell Error: motor mow fault. Hat mir irgendeiner eine Idee? Schlechter Kontakt zum Ardafruit M4???
LE c:b;?(@B
decrypt:AT+S,0x13
BLEc:b;?(@B
decrypt:AT+S,0x13
temp=22.4 humidity=80 CPU: PTAT=822 CTAT=874 deg=31.30 voltages: I/O=3.34 Core=1.21 VBAT=1.77
0:2:9 ctlDur=0.02 op=0 freem=231387 sp=20001474 volt=24.99 chg=0.00 tg=0.00,0.00 x=-1.69 y=-10.10 delta=-1.02 tow=409182400 lon=9.37851430 lat=49.17638263 h=1815.3 n=3488.89 e=-8438.22 d=-1511.81 sol=0 age=0.97
BLEc:b;?(@B
decrypt:AT+S,0x13
Error: motor mow fault
resetMotorFaultCounter 0
Error: motor mow fault
BLEc:b;?(@B
decrypt:AT+S,0x13
resetMotorFaultCounter 1
Error: motor mow fault
BLEc:b;?(@B
decrypt:AT+S,0x13
resetMotorFaultCounter 2
Error: motor mow fault
Dann habe ich noch eine Frage, kann man ein Adapterboard mit Pullup Widerständen für Brushless Motortreiberboard 1.1 auch mit Brushless Motortreiberboard 1.0 betreiben? Oder müssen die Widerstände wieder raus?
LE
c:b;?(@Bdecrypt:AT+S,0x13
BLE
c:b;?(@Bdecrypt:AT+S,0x13
temp=22.4 humidity=80 CPU: PTAT=822 CTAT=874 deg=31.30 voltages: I/O=3.34 Core=1.21 VBAT=1.77
0:2:9 ctlDur=0.02 op=0 freem=231387 sp=20001474 volt=24.99 chg=0.00 tg=0.00,0.00 x=-1.69 y=-10.10 delta=-1.02 tow=409182400 lon=9.37851430 lat=49.17638263 h=1815.3 n=3488.89 e=-8438.22 d=-1511.81 sol=0 age=0.97
BLE
c:b;?(@Bdecrypt:AT+S,0x13
Error: motor mow fault
resetMotorFaultCounter 0
Error: motor mow fault
BLE
c:b;?(@Bdecrypt:AT+S,0x13
resetMotorFaultCounter 1
Error: motor mow fault
BLE
c:b;?(@Bdecrypt:AT+S,0x13
resetMotorFaultCounter 2
Error: motor mow fault
Dann habe ich noch eine Frage, kann man ein Adapterboard mit Pullup Widerständen für Brushless Motortreiberboard 1.1 auch mit Brushless Motortreiberboard 1.0 betreiben? Oder müssen die Widerstände wieder raus?
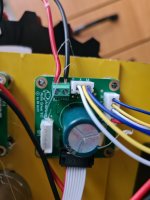
Was für Klemmen sind das (Größe/Raster)? Die würde ich gern gleich im Shop mitbestellen. Was hast Du da für Beinchen verwendet? Sind das nur Pins für Lochrasterschinen oder sind die noch abgewinkelt?So, jetzt gibt es einen kleinen Adapter (ca. 16x23mm) mit TVS Dioden, der in die Motorleitungen gelötet werdem kann oder an den BL Driver und damit auch größere Schraubkontakte bereit stellt.
Anhang anzeigen 3003
Bin noch am Überlegen, ob ich die Platine smart direkt am Treiber befestige oder ob das so nicht Schwingungsprobleme geben könnte.
Stephane_bzh
Member
Hi all,
Today the driver burnt again...
As always after a stop.
No spi communication anymore so drv8308 dead!
I don't have any drv8308 left to change, some are ordered but i'am still waiting for them.
I will try another solution (partly tested by another member @NormanB):
I ordered a BLDC8015A driver. (40Euro on ebay)
The idea is to make a small adaptor board to be able to use it without changing the code in the M4.
The adaptor board will probably use a PWM converter to convert the 26kHz PWM from the M4 to a 1kHZ (or to 0..5v if it is more easier to do).
We probably not need the adaptor board if we could have use 2 frequencies for the PWM in the M4.
The 26kHz for the 2 drives motor and the 1kHz for the mowing motor.
But i don't knwo if this is possible.
The advantage of using the adaptor board is that we don't need to change the M4 code.
I don't think the odometry is used for the mowing motor so, I will not have to use this signal.
I will report back as soon as i will get the 8015A drivers and if the adaptor works well i will put the schematic here.
This way we will have another solution fully compatible for the ardumower.
See you in 1 or 2 week!
Stephane
Hi,I will try another solution (partly tested by another member @NormanB):
I ordered a BLDC8015A driver. (40Euro on ebay)
as you can see in the Member-Thread from BerndS, he had his first BL-Setup with the mentioned BLDC8015A as well. I ordered his adapterboards some days ago, because due to the unknown status concerning the sudden-death of some drv8308 this was the way to go for me as well. the adaptors allow a perfect fit of the BLDC8015A to the BL-Interface/Adaptor-Card on the PCB.
due to other (job-)progress i did not assemble the bernds adapters, however, i already have my forseen mow-motor (57BL05) and the BLDC8015A as well as bernds set here on my desk waiting for some soldering...
please let us know how your project is going on - as soon as i have my adaptors and BLDCs ready to run i'll give a feedback as well.
best regards
Carsten