Raindancer Firmware

bernard

Well-known member
Hi Roland.
All my congratulations;) ;) ;) ;) ;)
This morning i follow your Raindancer WIKI ( with google translate) and upload the code into Sender and Mower (Paranello platform).
The First test are working like a charm :
The management of the motor is perfect and very smooth.
The perimeter work in my 200Ml area with a minimum MAG at 50 and the tracking not really perfect but well without any change into your setting.
The battery management is OK.
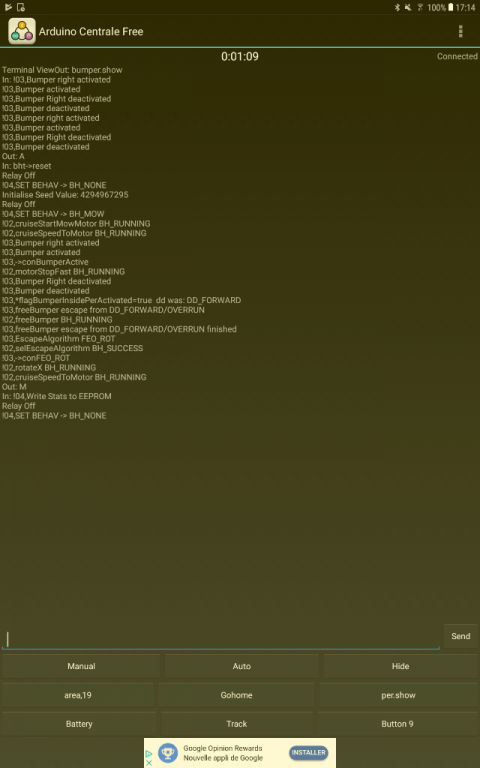
The BT is OK at 19200 Bps with "Arduino Central Free"


I thing i need your help in :
The charging station.:(
If i understand correctly the code use a "crossing Station" but in my case i want to use a "stopping station", so have you already work in this way or do i need to adjust your code.

Next setting are the Bumper ,Sonar
Again congratulation.
 
Hi Bernard,

thank you very much for testing the software and for the congratulations.

By the way, what means 200Ml? I don't know what Ml stands for.

The tracking algorithm must be adapted to the geometrie of the robot because the distance from the coils to the drive wheels is different. And maybe the closed loop control must be adapted because you use other Motors and wheels.

Until yesterday I worked on the obstacle recognistion on the perimeter. Sometimes the grass outside the perimeter gets so high and stong, that the bumper will be activated while tracking the perimeter. Now I am able to dodge this obstacle. https://www.youtube.com/watch?v=kbrM1jvCYg4
I found out in the last two month, that the behaviour of the robot is not very well when an obstacle stands less than 80cm away from perimeter. That I will work next on.


I haven't worked on the stopping station jet. You have to change or better expand the code. On one side the docking algorithm must be changed. On the other side, the exit must be programmed. And then it depends, if you want to use the "area" command to start the mowing from different positions.
If you are interested I can explain you how the software works and help you to implement this. The only requirement is, that you have basic understanding how a behaviour tree works. http://www.gamasutra.com/blogs/ChrisSimpson/20140717/221339/Behavior_trees_for_AI_How_they_work.php
The sonar is implemented in an external Arduino Nano. I use other sonar sensors than the original. This Nano is also used as a bumperduino with pressure wave tube.
Joachim wrote code for this Nano to use the SRF04 sensors. To recognize the distance he uses the pulsin function which blocks the codeflow. Therefore the recognition of the pressure wave tube will not work.
If you need the code, I can send it to you.

Don't hesitate to ask me if you need help :)
 
Hi Roland.
Sorry for the confusion : 200Ml is linear meter of wire so the lenght of the perimeter.

For the tracking it's work well with your setting and for the moment i didn't try to adjust it so ??


Code:
If you are interested I can explain you how the software works and help you to implement this


YES but certainly it's take a delay for me to review all (i spend 1 year to fully understand AZURIT and add my change).
To begin i think it's good if you can show me how to add 2 simples thing and it's help me to understand the working of the code:
First :
For the bumper i use the PCB1.3 : 2 contacts (left bumper and right one) i have change your code with your WIKI and the 2 contacts work perfectly but in the 2 cases the mower reverse but rotate in the same dir (Normal because you use only one).

So certainly a lot of change in the code but it's a good way to help me understand.
For the bumpersensor class it's not a problem for me
Simply add this kind of line: to make the diff between right and left:

Code:
if ((diBumperL == LOW) && !_bumperLeftActivated) {
   if (flagShowBumper) {
      errorHandler.setInfo("!03,Bumper Left activatedrn");
    }
    _bumperLeftActivated = true;
    //motor.hardStop();
  }
  if ((diBumperL == HIGH) && !_bumperLeftActivated) {
   if (flagShowBumper) {
      errorHandler.setInfo("!03,Bumper Left deactivatedrn");
    }
    _bumperLeftActivated = false;
    //motor.hardStop();
  }


But after into the behaviour i need your HELP:
behaviour.cpp
dnBumperActivated.setChild(&selEscabeObstacle1);
in bcondition and bdecorators also i think
need to add the difference between left and right but how ?

And the Second point maybe easier (small impact in the BTree "Stop the PCB if Temperature is more than 50 Deg") but WHAT ABOUT THE THREADING
I have the DHT temperature sensor working perfectly with is own full class and the PCB1.3.

The management is :
Definition:
//Setting for DHT22------------------------------------
#define DHTPIN 49 // temperature sensor DHT22
#define DHTTYPE DHT22 // DHT 22 (AM2302), AM2321
DHT dht(DHTPIN, DHTTYPE);

Setup:
dht.begin();
nextTimeReadDHT22 = millis() + 15000; //read only after all the setting of the mower are OK

And to read (carrefull that it's take delay to read ) :
case STATE_PERI_OUT_REV: //in normal mowing reverse after the wire trigger
readDHT22(); // here the mower is stop so can spend 250ms for reading

I don't want that you do this for me and borrow you but only your help to understand your coding way.

For the Sonar i can do without for the moment,but why you need other board to do this (the Newping class work perfectly with me) maybe the THREADING ??

Hope i have knowledge to do this ??????:(

The temp Class :
Temperatureclass.zip

Attachment: https://forum.ardumower.de/data/media/kunena/attachments/3545/Temperatureclass.zip/
 
Zuletzt bearbeitet von einem Moderator:
You have to take a look in the behaviour tree description on page 6: BHT Mowing.
Without this description you are not able to do anything.
Each leaf represents a class. Hatched leafs are used again and are defined in another part of the tree.

When I want to find a class, I search for it in the whole project. Classnames begin with T.

All BHT classes are instantiated in behaviour.cpp at the beginning. The BHT is build up in void TBehaviour::setup(). You are not really able to understand this build of the tree without the BHT description.
Another important thing in behaviour.cpp is the function void TBehaviour::reset(). Here all variables of the black board will be initiated.


Implemeting the bumper behaviour:
The Bumperservice has to provide two more funktions: isBumperActivatedLeft() and isBumperActivatedRight() and isBumperActivated() should be extended with _bumperLeftActivated and _bumperRightActivated

Now on the the BHT description you see in the upper left corner the Sequence: mseqBumperActive. This sequence is reponsible to stop the motors, free the bumper and select an escape algortihm. This is a memory sequence. When the next tick is running the node which returned running will be called direct again without calling the nodes on the left side of the running node.

There you can see, that TConBumperActive is the first leaf in the sequence. If this condition is true, the sequence is entered. In TConBumperActive bb.bumperSensor.isBumperActivated() is called to check if the bumper is activated. After the motor stopped, TFreeBumper is used to free the bumper. That means, the bumper will be freed in the opposit direction the mower has driven. Also the flags flagBumperOutsidePerActivated and flagBumperInsidePerActivated are set. After freeing the bumper, TselEscapeAlgorithm is called. Here the escape algorithm is selected depening on the driven direction and if the perimeter state changed from inside to outside after freeing. For drive direction DD_FORWARD you can see, that the algorithm bb.flagEscabeObstacleConFlag = FEO_ROT; is used if the bumper is activated inside perimeter.

On the right sode of the tree you see the decorator: TdnBumperActivated. Because flagBumperInsidePerActivated is set to true, the branch will be executed. Here the sequence mseqEscBackward is entered because the condition conFEO_ROT is true. (Classs: TconFEO_ROT I forgot somtimed to write the T in the BHT overview). And then you see TSetArcFEO_ROT is called, which sets the parameter for the rotation routine. Here I used a random number to calculate the rotation direction. Here you can also call bb.bumperSensor.isBumperActivatedLeft() and bb.bumperSensor.isBumperActivatedRight() to determine the rotate direction.


If the bumper outside is activated, then flagBumperOutsidePerActivated is true and the brach dnBumpPeriActivated on the right side of the sheet is used. Here the normal perimeter rotation algorithm is used. If you want to change this behaviour here, you could throw out the leaf TCalcAngle and put in TSetArcFEO_ROT. But you have to adapt TselEscapeAlgorithm also.
You have to change:
mseqEscOOPReverse.addChildren(&conFEO_BACKINSIDE, &calcAngle, &mseqRotatePer);
to
mseqEscOOPReverse.addChildren(&conFEO_BACKINSIDE, &setArcFEO_ROT, &mseqRotatePer);

And then test it.
I hope that helps for the first time.


DHT22 Sensor:
You can do this that way, but than you destroy the concept of the code because the hardware should only be called through the hardware.h interface. Therefor we have to create a new in out interface, which is able to change the port direction.
Anyway this can be adapted later. It would be nice if you would create a fork on github for this, than I can adapt this in the code later. Because I want to use this also.


I would realize this as DHT service which is not enabled and not inserted in the controller.
Easiest way is to copy DHT.h and DHT.cpp in he project. Derivate it from the thread class. (I use the arduino thread library a little bit adapted to my needs)
For this take a look how I have done this in the bumper class.

class TDHT : public Thread{
...
void setup();
//this is you begin- rename it only
virtual void run(); // this must be inserted also
...
{

// implemetn the run function
void TDHT::run()
{
runned();
}

In Raindancer.ino you have then create an instance of the object. Check out how I have done this with the bumper class.

TDHT DHT;

DHT.setup();
DHT.enable=false;

You don't have to put it to the controller, because we don't need calling run at the moment.

You can test it in the loop() function.
As long as you don't call the BHT you can put in as testcode after the loop statement for testing.
Use
errorHandler.setInfo(F("temp: %drn", value)); to print out values.

If this works, the service is finished an now you have to insert it in the BHT - after deleting the test code.

First create a reference for the TDHT Classs in Blackboard class. Blackboard.h. Check out how I did it with the TbumperSensor.

Then you have to change the following constructor to initialize the variable:

Blackboard(TMotorInterface &_motor, TPerimeterThread &_perimeterSenoren, TMowMotorSensor& _mowMotorSensor, TrangeSensor &_rangeSensor,
TbumperSensor &_bumperSensor, TbatterieSensor& _batterieSensor, CRotaryEncoder &_encoderL, CRotaryEncoder &_encoderR, TchargeSystem &_chargeSystem, TEEPROM &_eeprom):
motor(_motor),
perimeterSensoren(_perimeterSenoren),
rangeSensor(_rangeSensor),
bumperSensor(_bumperSensor),
mowMotorSensor(_mowMotorSensor),
batterieSensor(_batterieSensor),
encoderL(_encoderL),
encoderR(_encoderR),
chargeSystem(_chargeSystem),
eeprom(_eeprom)
...


Then in Raindancer.ino you have to change the call of
Blackboard myBlackboard(motor, perimeterSensoren, mowMotorSensor, rangeSensor, bumperSensor, batterieSensor, encoderL, encoderR, chargeSystem, eeprom);


Now you can access the service form the BHT over the blackboard.


For this I would create a new leaf in the tree and put it direct after TOverRun in mseqPerimeterForward. Because here the mower has stopped.
For creating the leafe I would copy the class TOverRun and rename it.
How to insert it in behaviour.cpp check out how I did it with TOverRun. And insert it in mseqPerimeterForward after &TOverRun .


Good luck :)
 
Hi Roland.
To see the BHT what is the soft i need to use (i try Splan 7.0 free but can't print in demo mode).
By.
 
Sorry, but I have to translate this. It makes it sometimes easier to understand what happend in the node.
 
Hi.
So the first programming test is KO.:(

Into BumperSensor class : No particular issue.
The right and left are detected when activate and release.
But i don't understand how the Rotate dir is register without a flag into the Blackboard (After the TFreeBumper the bumper is deactivate so i can't read them into TsetArcFEO_ROT)
Maybe need to put the flag into TFreeBumper ?
Here the change i made:

Code:
void TbumperSensor::run()
{
  runned();

  // Orignal Ardumower Bumper
#if CONF_DISABLE_BUMPER_SERVICE == false
  //bber-----------------------------------------------------

  if (!_bumperRightActivated && !_bumperLeftActivated && _bumperActivated) {
    if (flagShowBumper) {
      errorHandler.setInfo("!03,Bumper deactivatedrn");
    }
    _bumperActivated = false;
  }

  if (( diBumperL == HIGH ) && _bumperLeftActivated) {
    if (flagShowBumper) {
      errorHandler.setInfo("!03,Bumper Left deactivatedrn");
    }
    _bumperLeftActivated = false;
  }

  if (( diBumperR == HIGH ) && _bumperRightActivated) {
    if (flagShowBumper) {
      errorHandler.setInfo("!03,Bumper Right deactivatedrn");
    }
    _bumperRightActivated = false;
  }

  if ((diBumperL == LOW) && !_bumperLeftActivated) {
    if (flagShowBumper) {
      errorHandler.setInfo("!03,Bumper left activatedrn");
    }
    //bb.flagForceRotateDirection = FRD_CC;
    //bb.driveDirection = DD_FEOROTATECC;
    _bumperLeftActivated = true;
     

  }
  if ((diBumperR == LOW) && !_bumperRightActivated) {
    if (flagShowBumper) {
      errorHandler.setInfo("!03,Bumper right activatedrn");
    }
    //bb.flagForceRotateDirection = FRD_CW;
    //bb.driveDirection = DD_FEOROTATECW;
    _bumperRightActivated = true;

  }

  if ((_bumperRightActivated || _bumperLeftActivated)&& !_bumperActivated) {
    _bumperActivated = true;
    if (flagShowBumper) {
      errorHandler.setInfo("!03,Bumper activatedrn");
    }
  }

  //----------------------------------------------

#endif

#if CONF_DISABLE_BUMPERDUINO_SERVICE == false
  //#pragma message ("CONF_DISABLE_BUMPERDUINO_SERVICE AKTIVE")


  // Low active
  if (diBumperSensor == HIGH && _bumperDuinoActivated) {
    if (flagShowBumper) {
      errorHandler.setInfo("!03,BumperDuino deactivatedrn");
    }
    _bumperDuinoActivated = false;
  }

  if (diBumperSensor == LOW && !_bumperDuinoActivated) {
    if (flagShowBumper) {
      errorHandler.setInfo("!03,BumperDuino activatedrn");
    }
    _bumperDuinoActivated = true;
    //motor.hardStop();
  }

  /*
    if (flagShowBumper) {
    errorHandler.setInfo("!03,Bumper %drn", diBumperSensor.read());
    }
  */
#endif


So now the main i don't understand is that :
Into


Code:
TSetArcFEO_ROT() {}

    virtual void onInitialize(Blackboard& bb) {
      //bber -----------
      
      if (bb.bumperSensor.isBumperActivatedLeft()) { //can't work because the bumper is already released
        bb.flagForceRotateDirection = FRD_CC;
        bb.driveDirection = DD_FEOROTATECC;
      }

      if (bb.bumperSensor.isBumperActivatedRight()) {
        bb.flagForceRotateDirection = FRD_CW;
        bb.driveDirection = DD_FEOROTATECW;
      }

      bb.flagForceRotateDirection = FRD_CW;
      bb.driveDirection = DD_FEOROTATECW;
      //----------------------------------------
      bb.arcRotateXArc = myRandom(60, 135);
      if (bb.flagShowRotateX) {
        errorHandler.setInfo(F("!05,TSetArcFEO_ROT:60-135: %ldrn"), bb.arcRotateXArc);
      }
    }


I try with the 2 lines after the rotate test :
bb.flagForceRotateDirection = FRD_CW;
bb.driveDirection = DD_FEOROTATECW;
to force the CCW rotation but in all case the mower rotate CC ???


Certainly i misunderstood something.
Here the screenshot of the Terminal:
Screenshot_20180524-171430.png

By.
Attachment: https://forum.ardumower.de/data/media/kunena/attachments/3545/Screenshot_20180524-171430.png/
 
Zuletzt bearbeitet von einem Moderator:
How does the functoiins look like:
isBumperActivatedLeft()
isBumperActivatedRight()
Print out the return values in SetArcFEO_ROT

No, I am wrong. You have inserted:
bb.flagForceRotateDirection = FRD_CW;
bb.driveDirection = DD_FEOROTATECW

Maybe the command
show.rot //show rotate values
helps you.

Check out mseqRotateBump, TRotateX how the rotation works.

You are right,
But i don't understand how the Rotate dir is register without a flag into the Blackboard (After the TFreeBumper the bumper is deactivate so i can't read them into TsetArcFEO_ROT)

You have to latch it in an extra variable in the blackboard or in the service.

But why the mower not rotate CW with
bb.flagForceRotateDirection = FRD_CW;
bb.driveDirection = DD_FEOROTATECW
I don't know at the moment.

Can you please send me the whole code?
 
Sorry.

Code:
But why the mower not rotate CW with
bb.flagForceRotateDirection = FRD_CW;
bb.driveDirection = DD_FEOROTATECW
I don't know at the moment.

This work well if i putt CC instead of CW the rotate dir chage.
CW is clockWise and CC is like CCW counter clockwise.

I work again a little and send you the ZIP with whole code.
 
I just tested it. My mower rotated 3 times cw and then 2times cc. Then I got an error, that bumper was activated >5 times in 50seconds. That's ok.

Please try out my original code and try the lines

bb.flagForceRotateDirection = FRD_CW;
bb.driveDirection = DD_FEOROTATECW;
bb.arcRotateXArc = myRandom(60, 135);
at the end of onInitialize in TSetArcFEO_ROT.
Then the mower must be rotated CW.

and then

bb.flagForceRotateDirection = FRD_CC;
bb.driveDirection = DD_FEOROTATECC;
bb.arcRotateXArc = myRandom(60, 135);

at the end of onInitialize.
Then the mower must be rotated CC.

This must work, because mseqEscRotateCC and mseqEscRotateCW works very well.

Maybe you have a compiler problem? What do you use to compile? Try to delete the compiler output and build all new.

Another way to testing woud be change mseqEscBackward from:
mseqEscBackward.addChildren(&conFEO_ROT, &setArcFEO_ROT, &mseqRotateBump);

to
mseqEscBackward.addChildren(&conFEO_ROT, &setArcFEO_ROTCW, &mseqRotateBump);
or
mseqEscBackward.addChildren(&conFEO_ROT, &setArcFEO_ROTCC, &mseqRotateBump);

Anyway to have problems help to understand the code, because you have to go deeper :)

Put errohandler.setino(F"xxx")); in onInitialize and updated that you can see it is called.
 
Hi Roland.
YES It's work :) :) :)

Rotate On the left on Right bumper
And on the Right on left bumper.
I use Arduino IDE so no problem.

Anyway to have problems help to understand the code, because you have to go deeper

Yes sure because the Bumper work but the Behaviour Tree ?????????? i need time to understand.


Here the full code.
You can find all my change after the flag //bber
into the ZIP.


By
 
For the DHT22:

DHT22 Sensor:
You can do this that way, but than you destroy the concept of the code because the hardware should only be called through the hardware.h interface. Therefor we have to create a new in out interface, which is able to change the port direction.

i don't understand : which is able to change the port direction.
why Port Direction ????.
The DHT22 use a simple input to exchange data.

Need to go deeper !!!!

By.
 
Hello Bernard,

very well, that you solved the problem. I hope you mean your solution works now? But I am missing the zip file.

"Yes sure because the Bumper work but the Behaviour Tree ?????????? i need time to understand."
When you start it's not easy to get to understand what people thought while they programmed the code.
If you want, I would like to explain you the pattern of the code via skype a little bit. If you understand the pattern, then its always the same to change the code.
And it's then much easier for you to change things at the beginning.

Bye
Roland
 
Hi Roland.
I have download Github desktop, create a new branch
But when i click on Publish Branch i got this message:
Authentication failed. You may not have permission to access the repository or the repository may have been archived. Open options and verify that you're signed in with an account that has permission to access this repository.

Maybe you need to do Something in your side ??????
 
I am not sure, but do we have to work with pull requests?
When I do changes, I create a fork. Then I have to do a pull request and accept this.
When you do this, I got this pull request and then I 0have to accept this.

I think you can make changes to your fork, and then do a pull request to me. I will then accept this.
After accepting this, you have to make a new fork, that you get my changes also..

This means also then for me, I will never do changes directly to the master.

Maybe you find another way, but I don't know at the moment.

Check out this Video.
https://www.youtube.com/watch?v=_NrSWLQsDL4&index=2&list=PL4GsVqyuXHken9Xu6F8SKzAoZdBUKkKUi&t=0s
Yesterday I shifted the setup form the Blackboardvariables to blackboard.cpp


Code:
void TBehaviour::reset()
{
	errorHandler.setInfo(F("TBehaviour::resetrn"));
	bb.resetBB();
    behaviorTree.reset(bb);
	bb.setBehaviour(BH_NONE);
}


Code:
void Blackboard::resetBB(){
....
}


I think a good training woud be, that you do a new fork, put in your changes and do a change request.
But l am not sure, what we do with the config.h, because this is not the same. We need there a standard one.
 
What I forgot, you should programm it in a way that your changes are
universal or can be switched off in config.h.

I think we will learn best practice when we use it.
 
Oben