Tianchen TC-G158 conversion

patek

New member
Hi there! I am new to this forum, I’m french and I just bought a second hand Tianchen TC-G158 mower.
I just ordered and received the kit from Marotronics shop and I’m just about to “ardumowerize” my Tianchen.
I read in this forum that some members had already done this successfully, but I absolutely do not speak german, so I create this thread in the English section in the hope that it may also be useful to other Tianchen owners not speaking german.
First of all congratulations for this community project I'm looking forward to making my robot do its first laps with its new brain. I am a complete beginner in dealing with Arduino but it does not look to be too much complicated so here we go !

Herunder my first questions:

I would like initially make the robot run without RC receiver and without the ultrasonic sensors. which are the original
components of the mower that I defenitly need to replace with the ones in the marotronics kit?

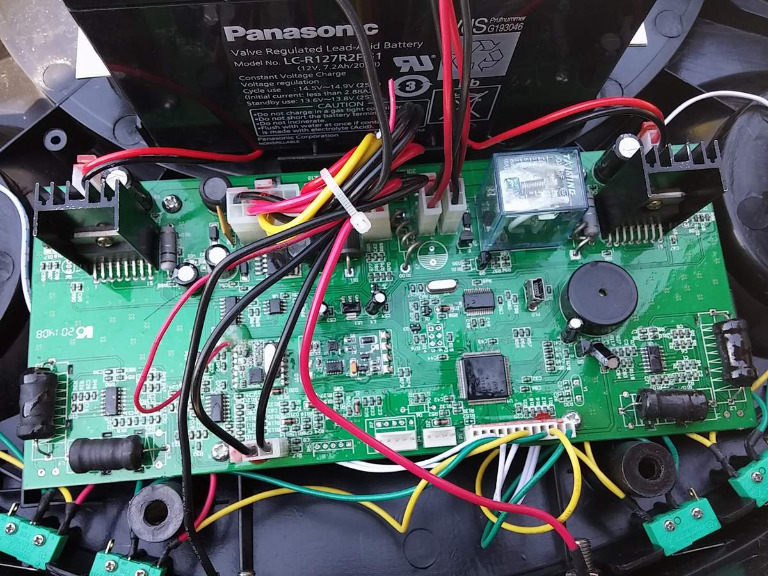
I intend to completely remove the original board, only using the Arduino Mega. Is there any reason why this choice is not possible?

I have not found on the forum any procedure for installation and first testings of the system..
I think I’m going to first test the Bluetooth module so as to interact with the Mega with my Android smartphone. Is it the right way to start or do you think I should better start differently?

May I use the stock Tianchen perimeter with ardumower?

Thanks for your answers and congratulations again for this great project, I will keep you informed of my progress!
 
Welcome to this forum :)

--Original board--
Long answer:
You could keep the original board and only replace the board's STC microcontroller by the Arduino Mega one (http://grauonline.de/wordpress/?p=50), but it's not recommended: replacing the STC microcontroller is difficult (there's the risk to damage the board), and the components (motor driver etc.) on these Tianchen boards tend to break sometimes, and then you'll have the problem to fix them... -- Short answer: use the kit ;)

--First start procedure/testing--
Have a look here in sections 'First-time using, Diagnostics, Starting the mower, Error counters etc.': http://www.ardumower.de/index.php/en/ardumower-topics/schematics-parts
--Arduino, bluetooth module and phone--
That's a fine way to start to later configure, steer/control and debug/monitor your final robot.

--Stock perimeter--
You can re-use the coils, the perimeter sender (Ardumower perimeter sender (v1) is Tianchen-compatible), and the perimeter wire.
 
Hi Alexander, thank you for your welcome message and your first recommendations.
I managed to make the HC-05 Bluetooth module work(not without difficulty :blink: ).

Here is a suggestion to help future beginners interfacing their Bluetooth module with Arduino board:

It would be helpfull to add the following notes from the bt.h file:

// NOTE for HC05: Connect KEY pin to 3.3V!
// NOTE for HC06/linvor: Do NOT pair/connect (LED must be blinking)
// NOTE for FBT06/MBTV4: First you have to solder the PIO11 pin to VCC (PIN 12) which is 3.3 Volts using a thin wire.


into the error message, line 203 of the bt.cpp

This should help future users to save time...

I can move on now, I installed the Pfod app on my Nexus, it seems to communicate properly!

I will read in detail page that you gave me the link, I will certainly quickly come back with new questions.

Thanks.

Hugues
 
Thank you Hugues, I have added the notes to the SVN version here (https://code.google.com/p/ardumower/). This SVN code contains the latest development changes. Once we think it's stable enough we'll make a snapshot of the development code and publish it as the next stable version under Downloads.
 
Hi again,

I will now have to interface the Mega with the mower components. I saw on the forum that a specific shield is being designed, but I'm defenitly not an expert in soldering and I want to go for an evolutionary option. I found this shield while browing for a development shield:
im130715001_8.jpg


More details here: http://www.robot-italy.com/en/mega-proto-screw-shield.html

I think i'm gonna opt for this shield. Does any of you see a cons-indication to this option?

Thanks.
Hugues
 
Hi,
I ordered the board, hope it won't be too long..

I'm working on how I will integrate the Perimeter detection system. Is there somwhere on the website pictures of exemplary embodiments of the perimeter detection? Does the orientation of the coils matters.

Other thing: The two coils I received from Marotronics are much smaller than the ones ont this photo:
arduino_perimeter_receiver.png

And they are also much smaller than the Tianchen stock ones.. I think that the Tianchen tianchen stock perimeter detection works pretty well, did someone managed to interface the Arduino board with these sensors? if so thank you to share with me the wiring and any mods to make in the code.
Here is a picture showing the stock perimeter detection on the Tianchen compared to ardumower kit coils:
786550Perimeterdetection.jpg

Thanks for your help.
 
@Hugues: You can see the arrangement for the coils here: http://www.ardumower.de/images/ardumower_spulen.jpg
Perimeter v1 uses two coils, and the same 7,8 Khz signal as Tianchen. You can re-use the Tianchen coils and they will give you more signal strength.

Btw, the two (or four) coils perimeter system (v1) is nice to start with something, but we did develop the perimeter v2 system later (and are still tuning it) because that has some improvements:

- one coil only
- detects signal from everywhere within the perimeter loop (so enables us to detect if the sender is running)
- not only detects signal strength, but also signal polarity which means 'inside' the perimeter loop the strength is detected as negative, and 'outside' the strength is detected as positive.

The new perimeter system v2 is documented only in German yet (bottom of this page), however all details will be published in English soon too. http://www.ardumower.de/index.php/de/anleitungen/2013-11-23-19-50-19/induktion
It is using the new MC motor drivers for the perimeter sender. The new perimeter system v2 will require the upcoming Ardumower 1.0 code, and it will only require a Mega (the Nanos will be obsolete).

Here's the current development code (which will become Ardumower 1.0 code):
https://code.google.com/p/ardumower/
 
Hi!
I have the same perimeter receiver coils, and I wonder, can I use this two boards itself instead a sound amplifier, to connect with mega? I prefer this options, because its better fit in original chassis.
 
I'm back ...
Happy New Year everyone!
sorry for not responding sooner, I was very busy and could not devote much time to the project. I received my development board, the problem is that it is delivered naked, so I had to learn how to make micro welds, there are such tiny diodes that I had to use a magnifying glass to check polarity before welding...

So, I configured bluetooth, wired wheels and mowing motors. The main functions are there and seem to work. Here is what it looks like so far:
788682IMG20150103165539.jpg


I would like to initially use the V1 perimeter so as to use the original sender of the Tianchen and make the initial running tests.
So here are some questions (Sorry if I asked questions already answered in the wiki, but I didn't find anywhere answers to my questions):
My wiring is as shown on this schematics:
ardumower_schematics.png

Can I use the latest SVN version by just changing the version of the perimeter library or do I need to downgrade the whole project to 0.9.3 version?

@AlexanderG: It would be great if every member could use the latest softaware version regardless of its hardware config, adapting to its specific individual project by just modifying a config file. this could also keep safe all the setyings (speeds, accel. etc..) when upgrading the software.

@Casper: I think you can not reuse the two original Tianchen perimeter boards, you need to wire as shown in the shematics.

Another question about the perimeter V1 : do I need to upload upload something into the perimeter receiver nano board or does the I2C do the jod?

Many thanks.

Hugues
 
Thanks for short answer AlexsandeG.
I was busy and I just left this project for few months, until now, when I thin is just last time to catch the grass and keep it short.
I will still have many questions, but first of all, I will go over forum once again, to clarify some misunderstanding.
I already got all boards, And now I'm going to connect it properly on V1 system.
The only thing I made different is, that I did replace racks with pulleys, and reduced the speed and force by half.
I have a difficult terrain with many angles up to 30 degree.
Attachment: https://forum.ardumower.de/data/media/kunena/attachments/1693/Tianchen1.jpg/
 
Zuletzt bearbeitet von einem Moderator:
Hello,
I know this topic is rather old now and maybe nobody still reads it. I am just desperate to find a spare original board for my defective Tianchen TC-G158 lawn mower, sold in France under the name "OneConcept Garden Hero". Since some of you have switched from the original board to a home made one, do you still have one of these boards laying around and in good condition that I could purchase ?
Otherwise do you know where I could order one. The reference number of this board is TC-GCJ123-ver 6.10.
Is there an alternative board readily available for my robot using a plug and play Arduino based electronic ? I know it is not the spirit of this forum, but I am not ready to spend months optimizing my lawn mower !!!
Thank you beforehand for your help,
Gérard

TC-G158board.JPG

Attachment: https://forum.ardumower.de/data/media/kunena/attachments/4333/TC-G158board.JPG/
 
Zuletzt bearbeitet von einem Moderator:
Dear GEGE74 ,
I hope you have solved your problem related the TC-GCJ123-ver 6.10 board of the Tianchen TC-G158 lawn mower .
I have your same problem of my Tianchen TC-G158 lawn mower named Duramaxx bought in Germany therefore I am searching where is possible to procure a working board .
May you help me ? How have you fixed your failure ?
Thanks a lot
Ciao from Italy
Enri
 
Oben