Perimeter Tutorial Videos

roland

Active member
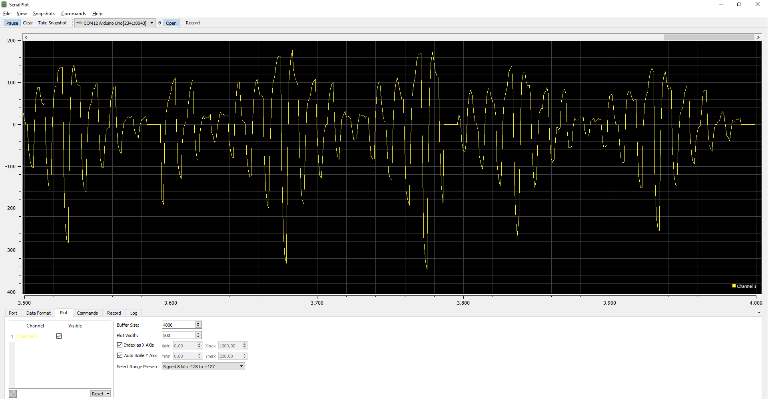
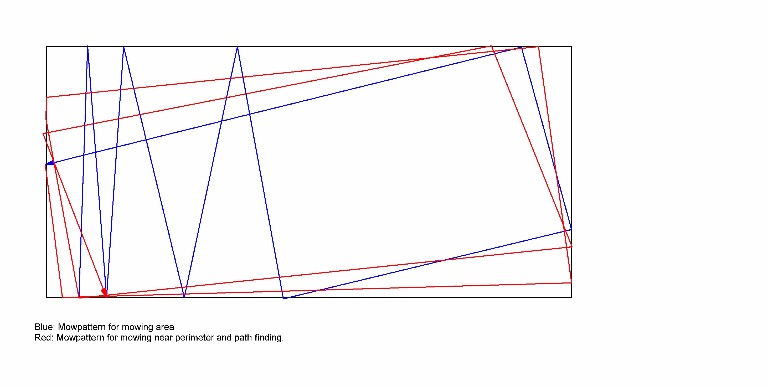
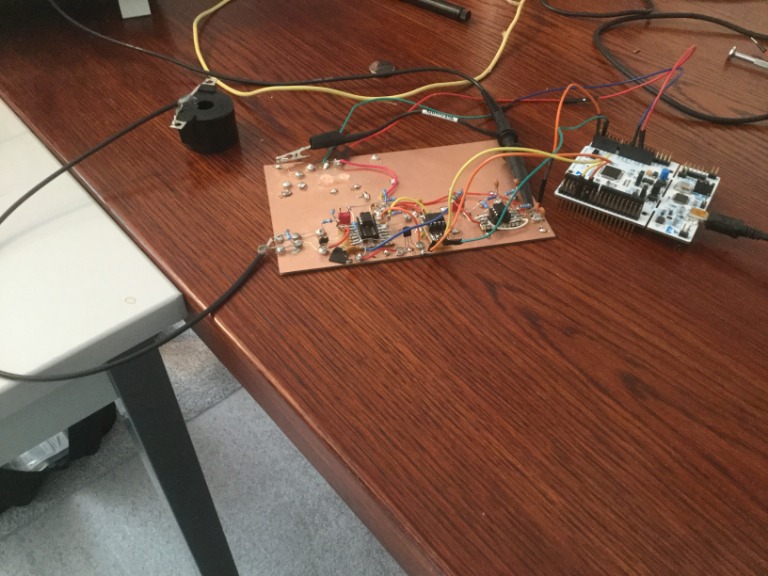
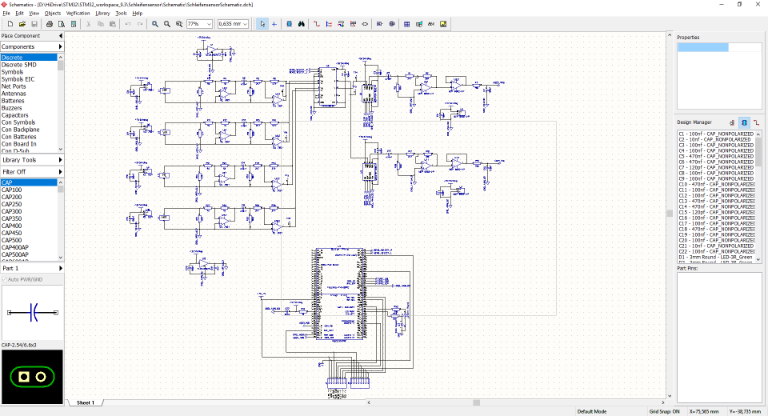
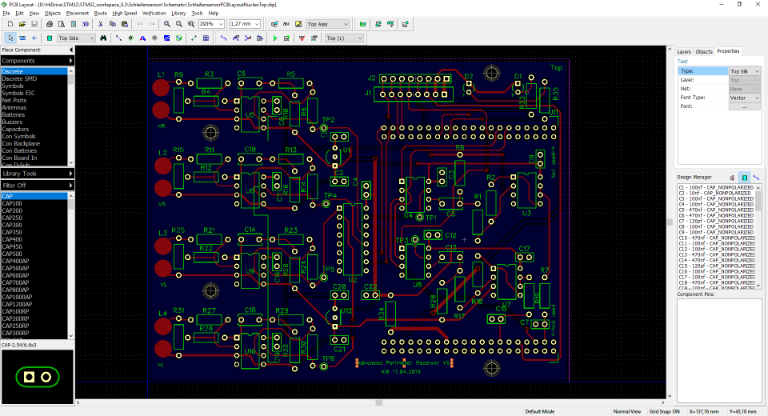
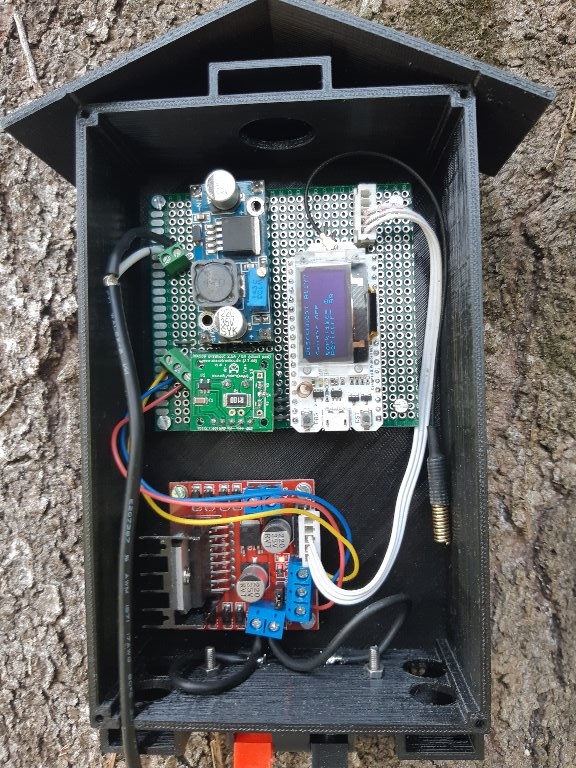
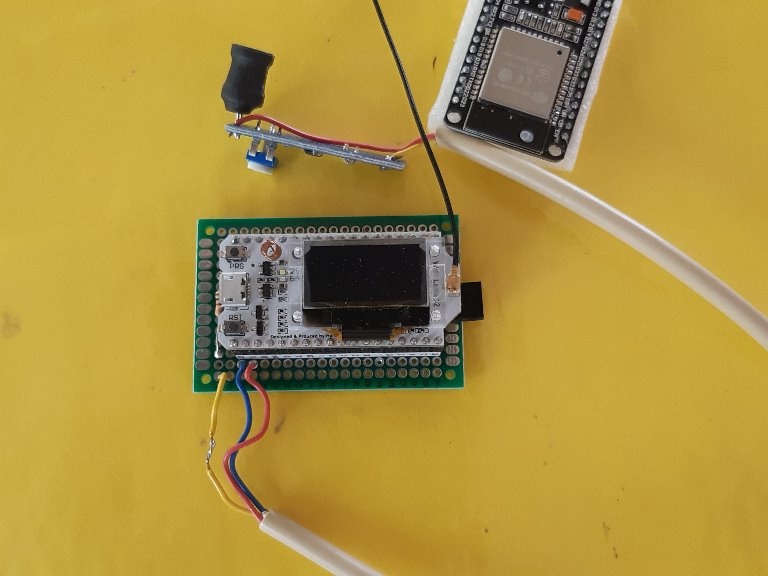
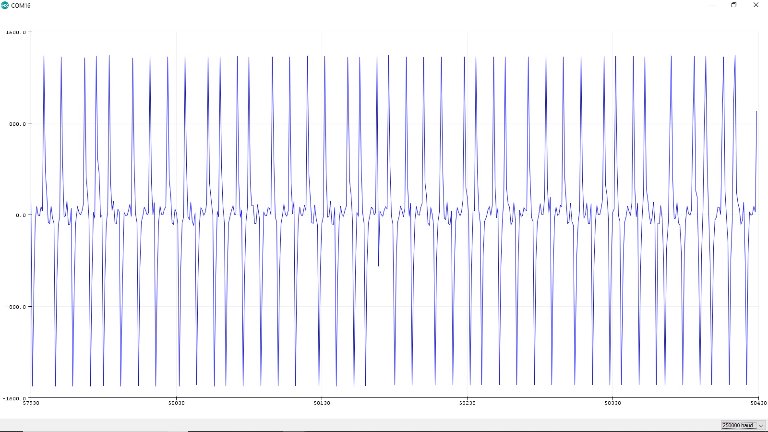
Hi, in order I just programmed the new perimeter recognition routine in my Raindancer firmware I decided to do a tutorial about how the perimeter recognition works. I used the english language in order there are a lot of people who don't speak german. But I speak english maybe 3 times a year and this was really a challenge and you will hear it :lol:

Today I recorded the videos about the theoretical part. Not really perfect and because I don't earn any money with that it must not be perfect. But I hope it helps people to understand the function of the perimeter recognition.
Before I start the practical part, it would be nice if some people can can take a look to the videos and give me feedback if you understand what I say and what I want to explain. Hopefullly it is not too boring. I have to speak very slowly :unsure:
https://youtu.be/0vkl8GalbNs https://youtu.be/UNVP10kjyu4 https://youtu.be/GwQHI8PqVIc https://youtu.be/TMDxJuEJg8w
https://youtu.be/yFnyuTg41mE
 
Hi Roland.
Great work and many thanks to have explain in english.
No problem to understand your english.
I have never paid attention to the fact that when the sender send 1 1 1 the coil detect only the first rising edge
Why did you want to use a long signal because the arduino is not very fast and maybe it's take time to read it.
In my test at 0.3m/s the mower need to have a new value each 20 ms to have a correct PID tracking
Again congratulation.
 
Hi Bernard,

thank you for the feedback.
Lets calculate some numbers.

The sender signal is 128bit long. Each bit has a duration of 104uS.

128*0,104mS=13,312ms
This means, the duration of one period is 13ms.

On the Due side, I sample 512 bit each 26uS.
512*0,026ms=13,312mS
This means, to sample a signal needs 13ms.

This sampling runs PARALLEL to the normal code. The ADC samples each value and the DMA bus writes it down direct to the memory.

In order I use two coils, I sample one coil and calculate the other coil.
Furthermore I don't do the calculation of the matched filter in the time domain like the Ardumower do.
Alexander found a really fast FFT conversion routine in the internet and and we build a matched filter routine in the frequency domain which needs round about 4ms to calculate the matched filter of 512bit. We splitted this routine in order it will not block the main loop. And now we have a really well timed matched filter routine.

Each coil is now calculated every 35ms.
At the moment when I only run my service routines I got 30000 loops/sec and when I activate the Behaviour Tree I get 20000 loops/sec. I have to see if I can hold this values in the future when I have finished the complete code.

The reason using a longer signal is, that finding a longer signal is more accurate and we get a much better result in the recognition process.
I don't use a SMAG. If I lost the signal, the mower stops. Therefore it is very important to have a good signal.

The matched filter in the frequency domain I will explain later in a video.
Until now I have finished two more videos.
https://youtu.be/Fk3Zz7m2biQ
https://youtu.be/wJ8JGGpKbic
 
Hi Roland.
Very good result.
I read your other post concerning your firmware and when i see your video it seam that you didn't use thee arduino Ide.
In th past I have tested the free version of VS Studio arduino plugin (breakpoint for debuggîng) but can't find better thing than arduino ide.
A very helpfull thing would be to explain exactly how you use it or link on tutorial (but not only "Hello Word" one )

Remark on the video when there are code or debug view I can't see it on Youtube. Maybe a bigger police help.

Congratulation for all your video.
 
Hi Bernard,

thanks again for the feedback.

I use http://www.visualmicro.com/ which I bought (but you don't have to buy it) with visual Studio 2015 (free version). At the beginning I use Debug mode but I didn't need it. Therfore I only compile in Release mode.
This software has 2 big advantages:
a) See the left tree. There you can sort your files in a logic manner
b) You have the full capability of intellisense and errorhandling of VS2015

If you use it first, it looks a little bit overhelming because of the complexity of VS2015.
But it is not because you don't need much of the menues.
When I have time, I will make a small video how I use it.

Remark on the video when there are code or debug view I can't see it on Youtube. Maybe a bigger police help.
The videos are in HD. You have to open the videos directly in Youtube (left click and copy URL). When the Video then starts it need some seconds after you see the full quality.
The Ardumower server decreases the video quality.

In the first post you wrote:
Why did you want to use a long signal
When I came back from vacation, my robot are not able to recognize the perimeter signal correctly anymore. I have not found the error jet.
Therefore I program an UNO for testing. Here I have a to use the original Ardumower signal. Take a look how the result of the matched filter looks like:

OriginalArdumowerSignal_2017-09-20.png


The matched filter output of the new 128 bit signal is much better.

Very strange, the server also decreases the quality of the picture I attached.
Attachment: https://forum.ardumower.de/data/med.../2936/OriginalArdumowerSignal_2017-09-20.png/
 
Zuletzt bearbeitet von einem Moderator:
Hi Roland.
I know Visual Studio, so no problem.
I have on my PC Vmicro and VS2012 so i test again , and yes it's perfectly working .
Video:
Sorry for YouTube it was in 480P but in HD it's perfect.
Picture:
For the picture in the Forum i have the same issu, i made a scancube 360Deg Ultra Hd picture of the PCB1.3 but i can't share it.
Only by WeTransfert.
Perimeter:
I have 2 test Platform (Paranelo with PCB1.3 and DUE and DENNA with PCB1.2 and DUE )and use my version of Azurit with sunray ADCMAN (Again thank to Alexander) and the original 24 Bits perimeter can be refresh each 13ms,and since 1 year i use it a lot without any error or problem but if you have Something more accurate why not ??
Firmware
I actualy work on my version of Azurit (MPU6050 with DMP and Separate Compass ) for Lane mowing but difficult to find Something perfectly accurate.
Hope you can find Something more efficient and wait for your "testing or working" firmware.


By.
 
Hope you can find Something more efficient
I am not in in competition with Sunray. I believe in chaotic mowing if the lawn area is not too big (up to 2000-3000 square meters). The reason for this is the look of the lawn. If you mow it from all angles a lot of times it looks much better. I mean real lawn not weed lawn. Therefore my aim is to build a mower which works at any weather like the Automower because it has to mow my lawn two to three times a day. And chaotic means not to only turn a random angle at the perimeter. There is also a plan behind this. Ans this is chaotic :lol: My code worked this year very good. But I think I can improve it. I use the concept of services and behaviour tree in the code. The code is very easy to change and to extend if one understand the concept. But using exact cards of the environment could be a problem. Here maybe another processor is needed. At the moment I have round about 50000 bytes free.

My lawn ends direct at a street. If I would use a smag the robot could run on the street if there would be an error at the perimeter. The signal must be perfect on all areas on the lawn without any compromise.

Here some pictures of my lawn this year and how I love it too see. Since May of this year I have not used a conventional mower.

IMG_0661.JPG


IMG_0666.JPG

Attachment: https://forum.ardumower.de/data/media/kunena/attachments/2936/IMG_0661.JPG/
 
Zuletzt bearbeitet von einem Moderator:
Hi Roland

Code:
I am not in in competition with Sunray

I never speak about Sunray i use only Azurit and the random mowing.
I view in working condition a lot of robot mower and only the bosh Indego algorithm is impressive for me.
But many of them use simply random move and it's work well.
By.
 
Hi Bernard,

looks like I mixed it up because I saw your robot mowing lane by lane.. Sorry.

For vmicro it is important to use the latest version. I found a bug in the software which is fixed now.
 
Hi Roland
Very beautifull lawn (Perfectly cut;) ).


Code:
And chaotic means not to only turn a random angle at the perimeter. There is also a plan behind this. Ans this is chaotic


I don't understand exactly what you mean.

I use a RL1000 since 2007 that is to say for 10 years without any problem exept changing battery, (The mowing pattern is a mix of Lane and Random and the efficience is really better that the only random). The mowing width 53CM help a lot for lane mowing.
It's why i want to try to do
Mixed of :
Lane mowing
Random Mowing
Arround Perimeter at 50 cm to 1 ml and maybe a better signal can help in this case.

For me the mapping like SUNRAY is very good but i don't have the knowledge to manage it (maybe you or Alexander or someone else ?)

I only want to share information and help when i can but never competition also.

By
 
Lane mowing
Random Mowing
Arround Perimeter at 50 cm to 1 ml and maybe a better signal can help in this case.

Yes this I mean with a plan behind this.
I have currently two mow pattern. Each which will be executed a random number in a row. And the angle is also random in a narrow intervall.

Have you some more precise information about the mow pattern of the RL1000? Maybe we can improve the the pattern together.
But first I have to do the basics.

Mowpattern.JPG


I came from vacation and my robot doesn't recognice the perimeter anymore. It tooks me the whole tuesday an two afterwork times to find the problem. The problem I found was, that the NANO clone has changed the frequency. The signal comes not out with 104uS. Maybe the crystal changed the output a little bit. That speaks against a long signal. But I will see. The new Nano is an Arduino original now and it works perfectly again. I changed also the recognition routine on the Nucle 446RE like described in the tutorial.
Attachment: https://forum.ardumower.de/data/media/kunena/attachments/2936/Mowpattern.JPG/
 
Zuletzt bearbeitet von einem Moderator:
Hallo Roland,

danke für deine Tutorialvideos. Sehr gut gemacht.

Eine Frage habe ich noch zu dem Schritt der Multiplikation der komplexen Zahlen im Frequenzbereich. Da kommen bei dir so seltsam kleine Zahlen bei raus. Normierst du in diesem Schritt noch zusätzlich?

Ich hatte das mir nur für die ersten 3 komplexen Zahlen in deinem Beispiel angeschaut:
1) (-28 + 0i) x (276 + 0i) = -7728 + 0i --> bei dir -2+0i
2) (-52 - 67i) x (13 - 257i) = -17895 + 12493i --> bei dir -5+2i
3) (-24 - 31i) x (333 - 2i) = -8054 - 10275i --> bei dir -2-3i

Oder habe ich da ein Verständnisproblem?

Gruß,
Jem
 
Hallo Jem,

vielen Dank für das positive Feedback.
Die multiplizierten Werte werden noch durch 4095 geteilt da die FFT und somit die iFFT auf 12Bit optimiert ist.
Alexander und ich haben mit diesen Parametern getestet. Wenn man ein sehr starkes Signal hat, kommt man so schon leicht über 4095 trotz Division durch 4095.
Die Multiplikation wird in den Funktionen
void DSP::mult_complex(DSP_TYPE *a_r, DSP_TYPE *a_i, DSP_TYPE *b_r, DSP_TYPE *b_i, DSP_TYPE *c_r, DSP_TYPE *c_i, int sz) und
inline void DSP::mult_shf_I( DSP_TYPE c, DSP_TYPE s, DSP_TYPE x, DSP_TYPE y, DSP_TYPE &u, DSP_TYPE &v)
durchgeführt. https://github.com/kwrtz/Raindancer/blob/master/code/Raindancer/dsp.cpp
Vielleicht hast du ja noch paar Ideen dieses weiter zu optimieren.

Gruß
Roland
 
Hi Roland.
2 or 3 month ago i work on the multiple area mowing
So i made some test with your 128Bits sigcode, I send it without issue in the second area with an ESP32 sender.
The result was very very good and very strong but the Azurit part code : "int16_t PerimeterClass::corrFilter" take 90 ms to decode the signal and the perimeter traking can't work well with this Duration.:evil:

I view in Raindancer that you use a different way to decode the signal and 15 step for the full decoding .

Can you estimate the duration of all this decoding to check if it's faster than the AZURIT way.
And Maybe try to explain how it's work inside your code itself (PerimeterColi.cpp)

My test:
The PerimeterClass::speedTest() return
For the 24 Bits Sigcode the matchfilter need 3.5ms
For a 48 Bits Sigcode the matchfilter need 14ms
For 128 Bits Sigcode the matchfilter need 90ms

And finally i always have some trouble (And certainly i am not alone) with the perimeter:
If the area have a big distance between wire (like 40m) the mower detect perimeter transition in the center of the area.

I thing you have solved this issue in raindancer so maybe we can do it in AZURIT ??:huh:

By.
 
Hi Bernard,

yes the calculation is faster.
I usesd in PerimeterCoil.cpp a statemachine for calculation, not to block the main loop.
Therefore the longest call of run() is round about 1ms.
I don't know the whole calculation time anymore.
The perimeter signal was calculated every 50ms as I remember.

I programmed in OOP style. So you need the files PerimeterCoil, dsp and create a class for each coil: PerimeterCoil coilL;
You have to adapt the files regarding errorHandler and use of adcman.
In perimeter.cpp you can see how I use it in function: UpdateState().
This is also a statemachine.

I think, I am not the right man to insert the code in Azurit because I don't know anything about this FW and I don't want to deal with it.


"If the area have a big distance between wire (like 40m) the mower detect perimeter transition in the center of the area."

The problem of this is, that the signal is too low.
But if you rebuild the Sender to send 3A through perimeter wire, you get in to other trouble.
a) need a lot of power
b) in small areas and near the perimeter the receiver overrides

Therefore I developed an advanced perimeter receiver - but not finished and tested yet.
This should have following properties:

Support 4 coils (but only measure 2 coils at a time)
The signal is 100bit long
The signal is only 5ms long and will be send every 53 ms - so you burn not much power if you send 3A over the line.
AGC - automatic gain control to reduce then amplifier when the perimeter overrides.
Supports I2C, Serial or the default PCB1.3 Perimeter connection for reading results.
Connect the coils with an RG174 cable to the amplifier and has no amplifier at the coil. But the coil can be soldered on the amplifier if needed.
Maybe later: Multiplex a second signal on the line.

But this has a price. I have to use a Nucleo446RE with an Cortex M4 processor and had to develop my own amplifier. Which makes it a little complex.
And I am not sure, if it is working how I expect.

Currently I orderd my first PCB prototype from China.
I got 5 PCBs. If you are interested in it, I can send you for testing one PCB if my tests works.
You have then to solder the ICs for only one coil. I think integrating it in Azurite is then much easier.

Here are some impressioins:

FirstTestCircuit.JPG

circuit.png

PCB.png

Attachment: https://forum.ardumower.de/data/media/kunena/attachments/2936/FirstTestCircuit.JPG/
 
Zuletzt bearbeitet von einem Moderator:
Hi Bernard,

have you replaced the nano in the sender with an ESP32 sender? If yes, can you tell me which ESP32 developmentboard you are used an give me the code, please?
This is maybe a good solution using bluetooth/wlan to connect to the sender with the mobilephone or maybe using bluetooth to check if the robot is near/in the station.
 
Hi Roland.
Yes i did not use the standard sender.
It's
DC/DC converter https://www.marotronics.de/DC-DC-Spannungsregler-LM2596S-Step-Down-Regler-einstellbar INA169 for current mesurément https://www.marotronics.de/INA169-Analog-DC-Current-Sensor-Breakout-60V-25A-5A-Marotronics Heltec ESP32 WIFI LORA Board. https://www.baybay.fr/itm/ESP32-LoR...721565?hash=item48b32d155d:g:R9AAAOSwZZlboebF And L298N motor Driver. https://www.marotronics.de/Motortreiber-L298N-Dual-H-Bruecke-Motor-Treiber All is connected like that.

The dc/dc is powered at 12 or 24 Vdc ,at the outpout it's 8 or 9V and go to the Motor driver.
The 5V of the output motor driver is used to power the ESP32 board.
The INA169 is powered at 3.3V to avoid issue on ESP32 but it did not work very well, it's better to power it at 5V and build a voltage diviser with 2 resistor.

Certainly this module can also work without screen but you can use a DC/DC converter with screen and sense view. https://www.marotronics.de/LED-DC-D...6-Step-Down-einstellbar-LED-Voltmeter-LM2596S https://www.baybay.fr/itm/ESP-32S-ESP-3212-ESP-WROOM-32-IoT-WiFi-Bluetooth-module-ESP32-Development/163459067973?hash=item260eeb7045:g:lbEAAOSwFs1cKQMN
To start the sender use your phone as acces point and with a browser type the IP adress of the receiver (see serial console or screen if heltec) follow by /area2/1 or /area2/0 or /area2/?
20190422_130348.jpg


And the simple proto receiver using a voltage diviser and powered by my PC USB.
20190422_131132.jpg


Here the arduino ide serial plotter at 10 CM of the wire see also into the ZIP
.
esp32receiveat10cm.jpg


And the 2 codes for sender and receiver.
esp32perimeter.zip


I use the WIFI to communicate with the Raspberry in the Mower.
Actualy the sender work perfectly BUT i have some trouble on the Raspberry WIFI side or maybe the ESP:evil: .The connection is OK one day and stop to work 2 or 3 days later and i need to reboot all ??????

My communication test show:
The Lora side work perfectly between the 2 modules but fail at 50 meters accross the wall of my house. (No issue at 200 Meters if no House or wall, only tree).
and i don't want to put a Lora module into the Mower.
The WIFI is OK but not very stable !!!!
The Bluetooth i have not tested but certainly it can be a very good idea because it's already on the PCB1.3 and don't need the Raspberry.

I have also a simple ESP32 (see receiver picture) and i can try to build a second sender to check if it work but normaly Heltec or other !!!!!!.

By.
Attachment: https://forum.ardumower.de/data/media/kunena/attachments/3545/20190422_131132.jpg/
 
Zuletzt bearbeitet von einem Moderator:
Oben