Du verwendest einen veralteten Browser. Es ist möglich, dass diese oder andere Websites nicht korrekt angezeigt werden.
Du solltest ein Upgrade durchführen oder einen alternativen Browser verwenden.
Du solltest ein Upgrade durchführen oder einen alternativen Browser verwenden.
New member with an old RL500 chassis!
- Ersteller superpat
- Erstellt am
Yes, I am using the 1.2 board.
Re your comment: "If you use a PCB 1.2 have you closed the lp3, for pinmotormowsense (pin AD3 on arduino). For me it's necessary to make the motor mow turning."
I had a look on the documentation and the board. That seems to be: P4MowRpm (which is next to the Used P8 ODO Right and P9 ODO Left). On P4MowRpm there are 3 PINs (GND, 5V and one without name/mark.
(1) Do you mean I just connect GND and 5V?
(2) Re bluetooth, you have done good work as I saw in your other postings. As a general question for all, is there a instruction that I can preconfigure/load the code from e.g. Arduino Uno. This would reduce the number of possible errors.
(If this its easy done maybe we can ask Markus even for a little surcharge e.g. 1€, to put the code on the Bluetooth chip before its shipped. (This could also be considered for the Arduino Boards).
Sorry for asking these questions. I am not that deep in electronics.
By.
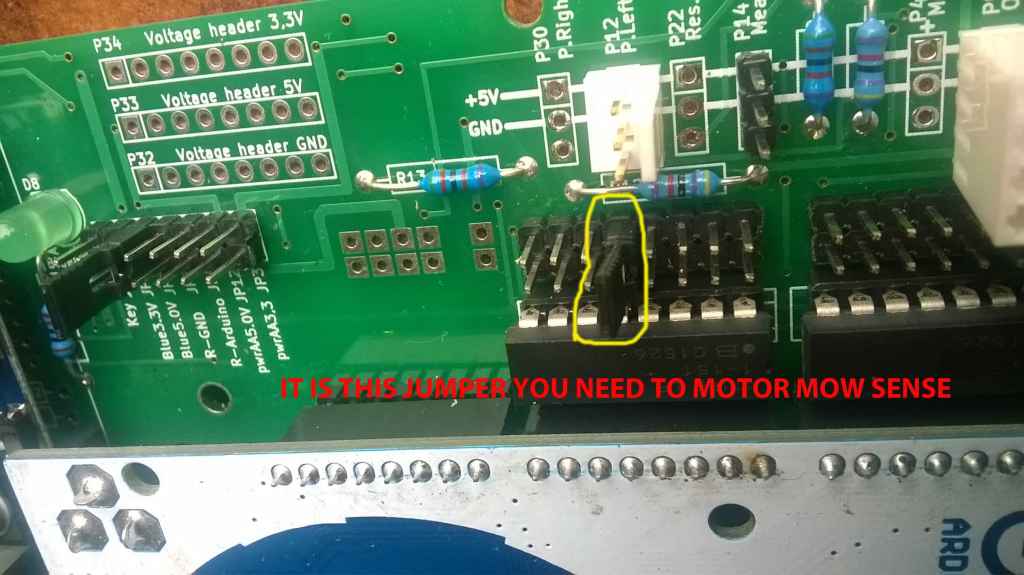
(1) NEVER CONNECT 5V TO GND
Here the jumper i mean
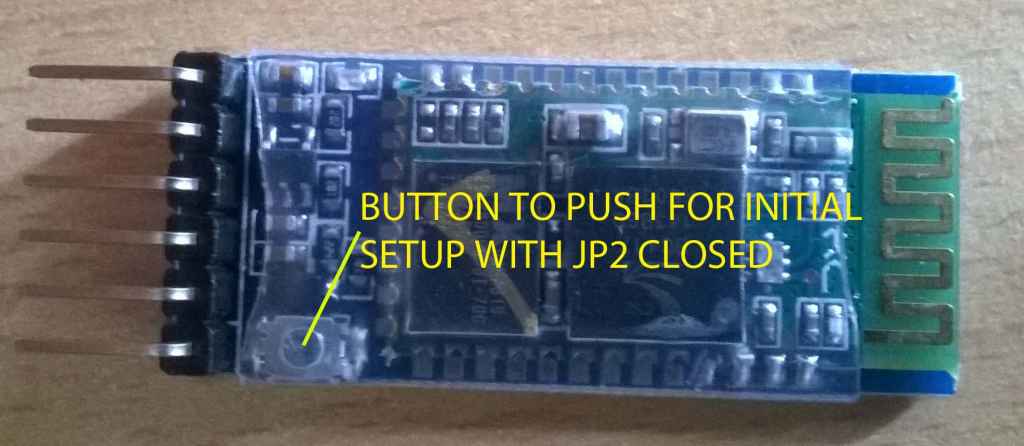
(2) To make HC05 working
You Need to put the jumper JP2 and push the small button in HC05 module during power up to put it in AT mode and follow the procedure on ardumower wiki
If it's don't work
Try to change in Mower.cpp the Bluetoothbaudrate form 19200 to 9600 or other value.
If this don't work i send you the procedure to set Baud rate parity etc on the HC05 whit Nano on a breadboard.
Bye.
PS I'am very busy this week end
Attachment: https://forum.ardumower.de/data/media/kunena/attachments/3545/motormow.jpg/
(1) NEVER CONNECT 5V TO GND
Here the jumper i mean
(2) To make HC05 working
You Need to put the jumper JP2 and push the small button in HC05 module during power up to put it in AT mode and follow the procedure on ardumower wiki
If it's don't work
Try to change in Mower.cpp the Bluetoothbaudrate form 19200 to 9600 or other value.
If this don't work i send you the procedure to set Baud rate parity etc on the HC05 whit Nano on a breadboard.
Bye.
PS I'am very busy this week end
Attachment: https://forum.ardumower.de/data/media/kunena/attachments/3545/motormow.jpg/
Zuletzt bearbeitet von einem Moderator:
Hello Boilevin, I had some progress. Bluetooth is still an issue.
In more detail. Thank you for the advice with the Jumper. I was not aware that it can be done in this way. So I changed it (soldering). I had two more issues. One caused by myself as their were two different currents on the Mower Protector board. I went in with #2 and left with #1. Second, it took some time to understand how to activate the motor from the Arduino user interface/console.
Different to the driving motors
(1) where I open the console and enter 'd' and then '1' after opening the console
(2) I need to open the console and immediately enter 'm' to toggle (switch the mower motor on and off)
(Here in German language: http://wiki.ardumower.de/index.php?title=Fehlerbehebung)
-> So finally sequentially i went through all three motors (having removed the blades).
Re Bluetooth, its possible that I used the wrong connection PINs, the wrong voltage (5V or 3.3V) etc (see picture). I think in general it would be best to configure them just with a naked arduino and a breadboard (keeping the options on what can go wrong low). I have a Arduino nano (in the picture there is a Arduino Uno; or we do it with the standard mega board all people should have). I attach some pictures. (I did not try to change the codes as I had a fast blinking light yesterday but never slow and today there was nothing)
There is no hurry to reply as I cannot go ahead within the next 7 days.
Again, thank you very much. Maybe I would have not managed on my own. Or it would have taken much longer.
Cheers, Klaus
Attachment: https://forum.ardumower.de/data/media/kunena/attachments/3426/IMG_7281.jpg/
Zuletzt bearbeitet von einem Moderator:
Hi.
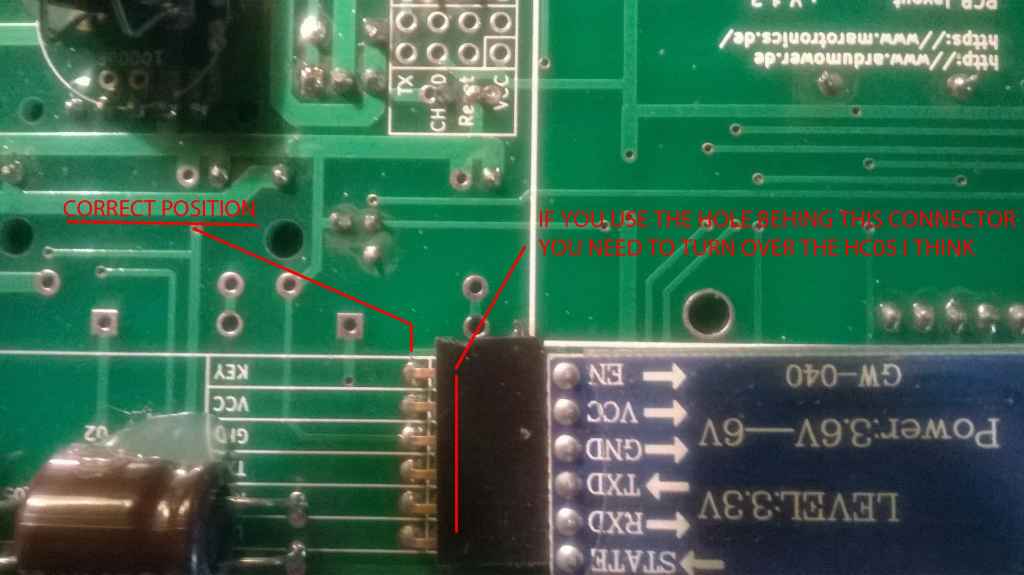
On IMG7281 what i see is no good.
If you put the HC05 in this position you need to solder to the other Hole.
Verify on your board but i thing you need to turn over the HC05 to use the solder pin you have choose.
I hope you don't crash the module.
Key--EN
VCC--VCC
GND--GND
TX--TX
RX--RX
LED--STATE
There is two way to put the HC05 It' s write on the board and the position you have is not corresponding.
I had the problem and read a lot of post in forum to understand..
What is working perfectly for me with Pfod
Do not forget the small and hard button
By
Attachment: https://forum.ardumower.de/data/media/kunena/attachments/3545/hc05-1.jpg/
Zuletzt bearbeitet von einem Moderator:
Hello Boilevin, dear All,
it took a little longer until I came back. Now I had a good progress. In more detail:
1. I changed the bluetooth HC-05 connection according to your picture. (Maybe the connectors holes on the boards, that I had wrongly used should be removed).
2. It took some time until i realized the code has to be loaded on the HC-05. Therefore I pressed the button and switched the mower on. The HC-05 was blinking very low. Then I connected the USB Connect to the PC, opened the serial monitor, pressed D and then 3 (see Markus http://www.ardumower.de/index.php/d...-handy/85-bluetooth-modul-hc-05?start=20#6885 )
----
Switch off electricity, remove USB Connection/Cable.
Press Button on HC-05 while switching on (Main switch or put battery in)
HC-05 LED is blinking slow
Connect USB Cable
Start Arduino/Ardumower Software, Open Serial Monitor
Press: 'd', Press '3'
--> Send (Setup BT module config (quick baudscan/recommended)
HC-5 configuration starts.
At the end:
setting name Ardumower...
send: AT+NAME=Ardumower
received: OK
=>success
setting pin 1234...
send: AT+PSWD=1234
received: OK
=>success
setting baudrate 19200...
send: AT+UART=19200,0,0
received: OK
=>success
You may restart BT module now!
-----
Switch mower off. remove USB Cable.
Connect mower with Smartphone (either PfodApp or Arduremote. -> The program menu is coming. (this I shortened as I has a connection before but was not aware that the menu/code was missed and had to be uploaded).
I put the code on two different HC-05 modules and tested. (Markus could consider to upload the code before shipping the HC-05 in case other people have problems, too).
One question for you, Boilevin? I can remove JP2 now?
Then I have some minor issues like connecting additional sensors e.g. the compass, see how to connect the RL500 bumper wire, energy consumption, batteries etc.
Mainly thanks to you Boilevin (and for sure the Forum Entries, the Arduino team etc) now there should be no showstopper and it should not take that long until the mower will make some test runs.
Thanks you very much, Klaus
Hi Klauss
Good if it's work.
In the HC05 there is no "Code " but only setting that the arduino send via the console (Name,Baudrate,Pin code for connecting with your phone).
To do that you need to put the HC05 in "AT Command mode by pressing the button and jump the JP2 at the power up" so the HC05 led blink slowly indicate that it is in AT MODE and only at this time you can use the D and 3 of the arduino console.
After setting in the HC05 it s better to remove the JP2.If you forget it'not a problem for your HC05 with button.
If you have a HC05 without the small button you need to remove the JP2 to make the HC05 work in normal mode and not in AT MODE.
As i view now you have a correct Bluetooth connection with your phone so it more easy with Pfod to make test
I do not use the Compass for the moment so can't help you with this point.
Normaly the bumper in RL500 are contact and easy to connect and diagnose via Pfod.
Actualy i work on the perimeter sender and receiver.
Good luck and good week end.